
Table of Contents
Learnshare Basics
Learnshare is a course communication platform. It makes course communication more transparent, organized, and efficient. Through leveraging both asynchronous and synchronous communication, you can do away with all other tools you use for course communication. This includes your discussion forum, Slack, and even email!
Learnshare streamlines course communication through both Topics and Chats:
- Topics are asynchronous spaces for all members of your course to share ideas and collaborate. You can create as many or as little as you’d like depending upon your specific course structure. Topics help keep all course discussions, announcements, and questions neatly organized. For example, you can set up specific topics for questions regarding different parts of your course like “Projects" and “Homework Questions”.
- Chats are synchronous spaces with instant messaging, like Slack Channels. With chats, instructors can eliminate the need for email completely through course-wide, group, and direct messaging.
Here, we’ll show you how to set up your course in Learnshare’s secure, course communication platform. With this guide, you'll see how easy it is to set up your virtual digital classroom in under 5 minutes!
Setting up your Course
Create your course after
signing up for Learnshare.
Create your course Topics
Course topics are where all course announcements, discussions, and Q&A are organized and archived. Every post, comment, and answer within your topics are easily searchable by keyword, ensuring that students can access the information they need, whenever they need it. Rather than spending countless hours every week answering student questions in siloed email chains, everyone in your course can now collaborate directly in the appropriate topic.
Your topic names should be relevant and easily understood by all members of your course. They should help inform everyone what the topic is for and what they should or shouldn’t be posting in it.
Therefore, it’s a good idea to start off more broad with your initial topics so that when students first join your course, it’s easier to get oriented. Then, as your course progresses and more specific conversations happen outside of the scope of topics you’ve already created, you can add more topics for these conversations organically.
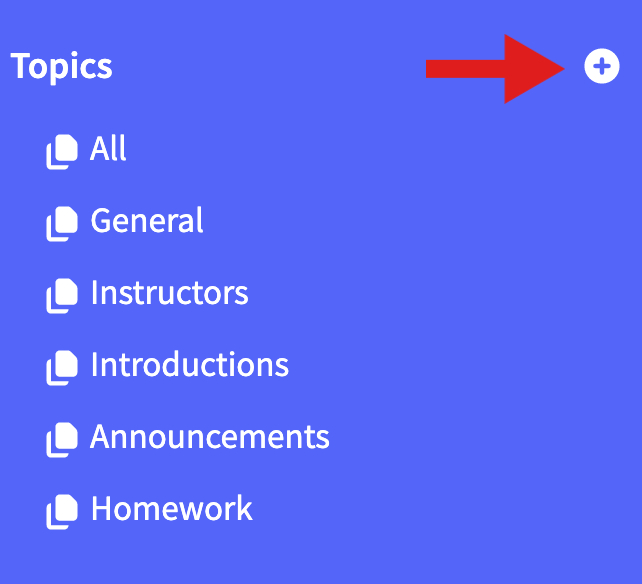
When creating a topic, you can also add a topic description to help further explain what the topic is for and how it should be used! When you first create your course, we create some default topics for you. These topics are General, Introductions, and Announcements.
We provide three setting options for topics: Open, Read-only, and Instructor-only:
- Open: Everyone in the course has access
- Read-only: Visible and accessible to everyone in the course, but only instructors have the ability to post in these topics.
- Instructor-only: Only visible and accessible to instructors. Instructor-only topics are perfect for collaborating with teaching assistants, course administrators, and anyone else who is helping you run your course.
Create your course Chats
Just like topics, you can create course-wide chatrooms for members to collaborate in real-time. We create a default "General" chat for you. Chats have the same two setting options as topics.
Chats help reduce the need for email by allowing you and students to collaborate in real-time. With chat, it’s possible for messages to get buried under newer messages as your course becomes more active. So, chats are best used for informal discussions and quick questions rather than in-depth discussions or Q&A, which are better suited for topics.

Inviting Students
Invite students through course settings via the gear icon in the top left margin of your course.
Learnshare creates a custom invite link found in your course settings. Simply share the invite link with everyone you want to provide access with to your course. The most common way to do this is by sending an email with the link to your class roster and any other instructors you have in your course.
Once students sign up for Learnshare and click your course invite link, they'll be automatically given access to your course. If they're not already signed up for Learnshare and click the link without an account, Learnshare will direct them to the registration page and once they sign up they'll be added to your course immediately.
For your security, course invite links expire after 30 days. If someone tries to join your course with the expired link, they will be told to contact the course instructor for the updated link. Your course invite link should be kept private only be shared with those who you want to have access to your course.
Using Learnshare in your Course
Welcoming Students & Setting Course Guidelines
Once you’ve created your course topics, chats, and have invited students, you’re ready to use Learnshare! To ensure that both you and students get the most out of your course, you’ll want to set clear expectations for how Learnshare should be used.
Here are some tips for making communication more efficient with Learnshare:
- Define the purpose of each topic and chatroom in your names and descriptions.
- Introduce yourself and have students do the same in the introductions topic. It helps students get familiar with how to use topics!
- Define how and when to use upvotes, emojis, and reactions. This helps reduce the need for follow-up messages which keeps both topics and chats more organized.
- Ensure that everyone in your course has email notifications turned on. This way, if there is something time-sensitive that needs to be communicated while they're offline, they can be reached via email with the @ tag.
-
As your course progresses, continue to pin all important announcements and posts to make sure they’re seen and accessible.
Pro Tip: Before inviting students, make sure to pin your welcome post and include any information that could help students get started with your Learnshare course. This could include information about your discussion guidelines or first steps they should take after joining!
When to post in Topics versus Chats
Topics, being asynchronous, can be used in times where there's no expectation for an immediate response. This helps ensure that all members of the course are able to use Learnshare efficiently as there's no urgent pressure to drop what they're doing to respond.
Chats, being synchronous, can be used in times where there's a time-constraint for a response or answer. For example, a direct message can be used in place of email so that a student can get an answer to their question while putting the final touches on a project before submitting.
Members of your course can also ask themselves the following questions to help make the answer more clear:
- Will I want access to this information later?
- Will other members of the course want access to this information later?
If the answer to either of the above questions is yes, it’s likely a good idea to choose to post within a topic rather than a chat. This way, the content of the post and its comments or answers will be archived and easily accessible in the future.
Posting in Topics
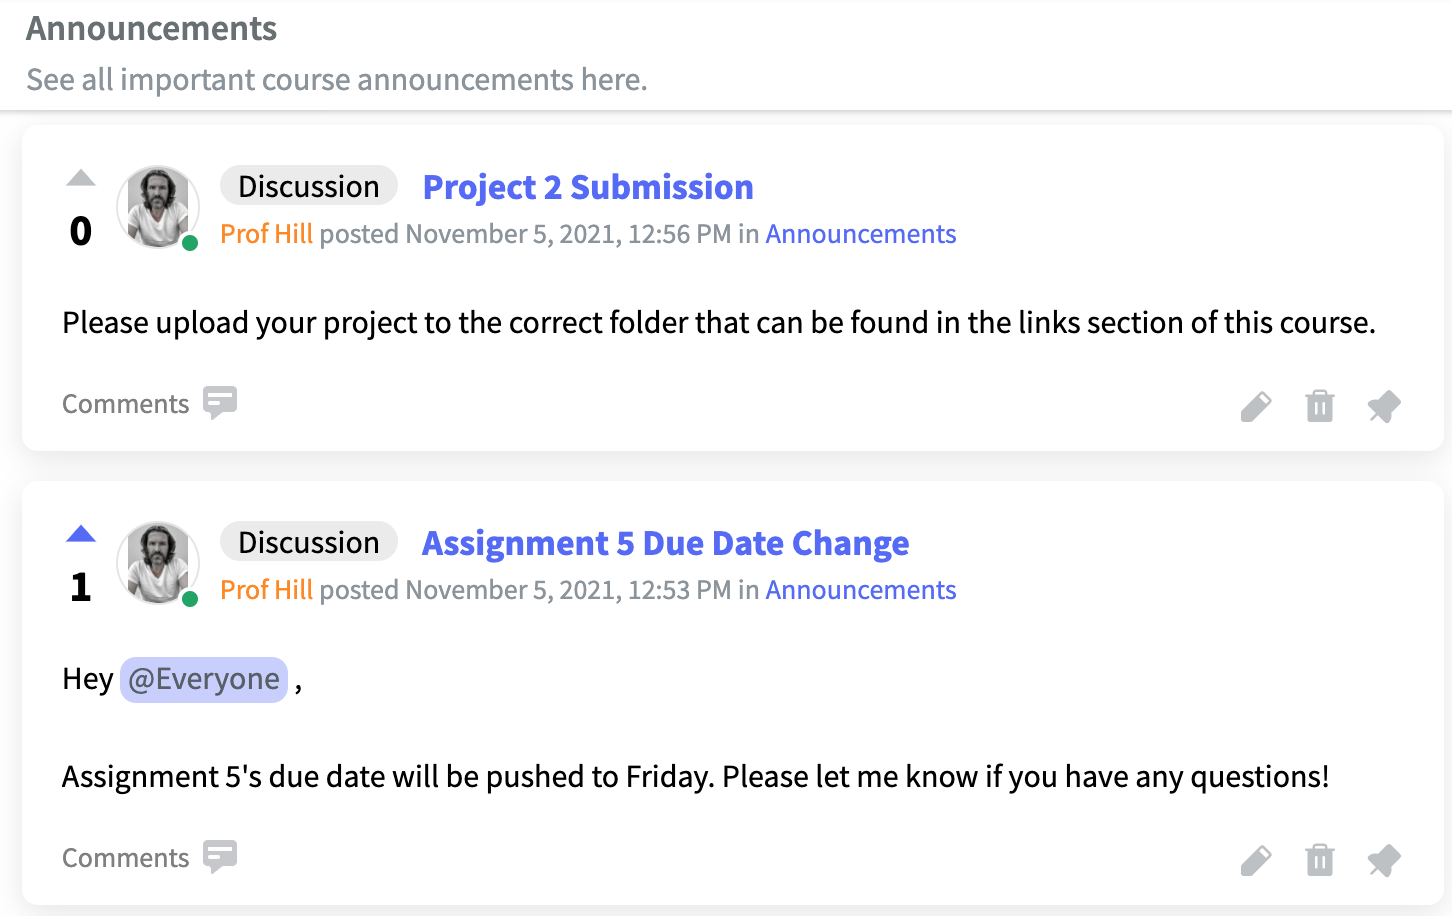
There are two different post types you use within topics: Discussions and Questions. Both can be upvoted by members of your course. Upvotes can be used as a way to show support for a question or discussion.
Discussions are similar to the post, comment, and reply functionality that would see on a Facebook or LinkedIn post. They support comments, replies, and likes.
Questions have answers rather than comments. Questions uniquely have one of two labels assigned to them: resolved and unresolved. By default, when a new question is posted it will be automatically marked as unresolved. This allows for everyone in the course to easily see what questions still need answers. Once a question receives the correct answer, course instructors can then toggle the "unresolved" label to "resolved" to keep their course organized.
Notifications
Learnshare offers both in-app and email notifications to help everyone stay connected. Notifications will be created for comments, replies, and mentions.
Mentions
Mentions allow you to tag individual members or all members of your course at once. For example, by adding @everyone in your post, you will send the post as an email and in-app notification to everyone in your course. You can use @ mentions and notifications to ensure that no important information or announcement goes unnoticed. Mentions are supported in both topics and chats.
Pinning
Instructors can “pin” important posts at the top of a topic. With pins, students have fast and easy access to important course information at their fingertips.
Course Links
Instructors can create course links in the bottom left margin of their course. Course links can be used as a way to provide quick access to important course materials and resources.
Course Settings
Managing Your Course
All your course settings are managed through the gear icon located in the top left of your course. As an instructor, you can delete any post, comment, reply, or chat in your courseーeven if it’s not your own. Students only have the ability to delete their own.
Pro Tip: Don't worry about trying to make every small detail perfect before inviting students. You can continue to make changes and improve your course as it evolves naturally over time!
Summary
Your Learnshare course helps act as a virtual classroom where all members of your course can collaborate without ever having to step foot into a classroom. Through leveraging the power of both topics and chats, you’ll be able to improve communication in your course with ease.
Questions about Learnshare? Send me an email or get in touch on Twitter.

